serving the solutions day and night

Pages

Showing posts with label option set. Show all posts

Saturday, June 8, 2013

Retrieve Multiple Dynamics CRM 2011 Entity Records from BizTalk 2010 Server

Retrieve Multiple Dynamics CRM 2011 Entity Records from BizTalk 2010 Server
1)Create new map (MCRM_List.btm)

2) Added <Fetch><Query/></Fetch> schema in the SAuditXML.xml schema

3)Select Source Schema (SAuditXML), Desitnation Schema(DNS_BTS_CRM.organixationservice_schemas_microsoft_com_xrm_2011_contracts_services -> RetrieveMultiple)

4)Make Query(source) link to FetchExpression->Query(Destination)
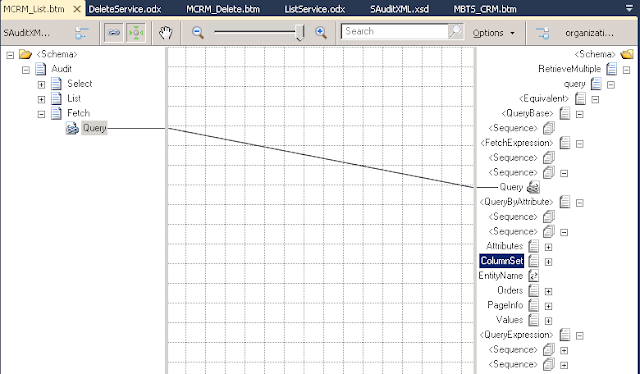

Create/Update/Delete Dynamics CRM 2011 Entity Record from BizTalk 2010 Server

Create Dynamics CRM 2011 Entity Record from BizTalk 2010 Server

1)Create new map (MCRM_Create.btm)

2)Select Source Schema (SAuditXML), Desitnation Schema(DNS_BTS_CRM.organixationservice_schemas_microsoft_com_xrm_2011_contracts_services -> Create)

3)Rename Page name (Enity), make EnityName(source) link to LogicalName(Destination)


Thursday, February 21, 2013

CRM Metadata

Metadata is defined as data about data. MS Dynamics CRM uses a metadata driven architecture to provide the flexibility to create custom entities and additional system entity attributes.
MS Dynamics CRM retrieves the record data from the metadata (entities, attributes, relationships, and option sets.), which in turn retrieves information from the underlying system data. MS Dynamics CRM stores its underlying system data in a relational database using Microsoft SQL Server.

MS Dynamics User Interface  ->  Metadata ->  Underlying System Data (SQL Server)

The entity metadata controls the grid and form layout, and how navigation options are presented. The metadata makes heavy use of MS Dynamics CRM Web services and XML data formats.

Make changes directly to CRM database in Microsoft SQL Server, risk of damaging the metadata and creating errors in your system.

Tuesday, February 12, 2013

Get CRM PickList & Global OptionSet using c#

using System.ServiceModel.Description;
using Microsoft.Xrm.Sdk;
using Microsoft.Xrm.Sdk.Client;
using Microsoft.Xrm.Sdk.Query;
using Microsoft.Xrm.Sdk.Messages;
using Microsoft.Xrm.Sdk.Metadata;

Uri OrganizationUri = new Uri(System.Configuration.ConfigurationManager.AppSettings["CRM_Organization_URI"].ToString());
Uri HomeRealmUri = null;
Dictionary<String, String> dicState = new Dictionary<String, String>();
Dictionary<String, String> dicSuffix = new Dictionary<String, String>();

Wednesday, October 3, 2012

Microsoft Dynamics CRM 2011 Data Management - Import, Export, Duplicate & Delete

Import
  • CRM Import Files formats: XML Spreadsheet 2003 (.xml), Comma-separated values (.csv), Rext (.txt), Compressed files (.zip)
  • Include a column for each required field on the entity into which you are importing the data.
  • One import file for each type of entity. 
  • Import multiple files into a single .zip file.
  • Maximum 8 megabytes (MB) size for each import file. 
  • Import Data Wizard basic process: Prepare the import files, Import the file and map the records & View the results and correct failures.
  • Dynamics CRM allows you to create templates for your import that you can download from the system.  In the Settings area -> click Data Management - > click Templates for Data Import. OR On the application ribbon -> click the Import Data button -> select Download Template for Import.
  • An import template outputs an XML file with all of the columns for the entity you selected:
    • All possible data fields for the entity are included.
    • All of the column headers are named and labeled correctly. 
    • Required data field names are bold in the top row.
    • Each cell provides additional information about the data that should go in the field, such as its  data type, maximum and minimum values, or maximum length.
    • For option sets, the template displays a list of the possible values for the field. 
    • If you try to enter a value that is not included in the option set or not in the format, you receive an error message
  • On the application ribbon -> click the Import Data button OR click the File tab -> select Import  OR Data from the Tools menu -> The Import Data Wizard opens.